{ « title »: « How to Install a TV Antenna in the Attic for Optimal Performance in All Weather Conditions », « full_text »: «
Watching television has transformed dramatically in recent years, with many households choosing to access over-the-air television for free channels and a broader selection of content. For those looking to enjoy this benefit whilst avoiding the hassle of outdoor installations, setting up an aerial inside your loft is an excellent solution. This approach not only shields your equipment from the elements but also delivers impressive reception quality in all weather conditions. Whether you live in a densely populated urban area or a more remote countryside location, understanding how to install a TV antenna in the attic can unlock a wealth of free entertainment without monthly subscriptions.
Choosing and positioning your attic aerial
Selecting the Right Type of Aerial for Your Needs
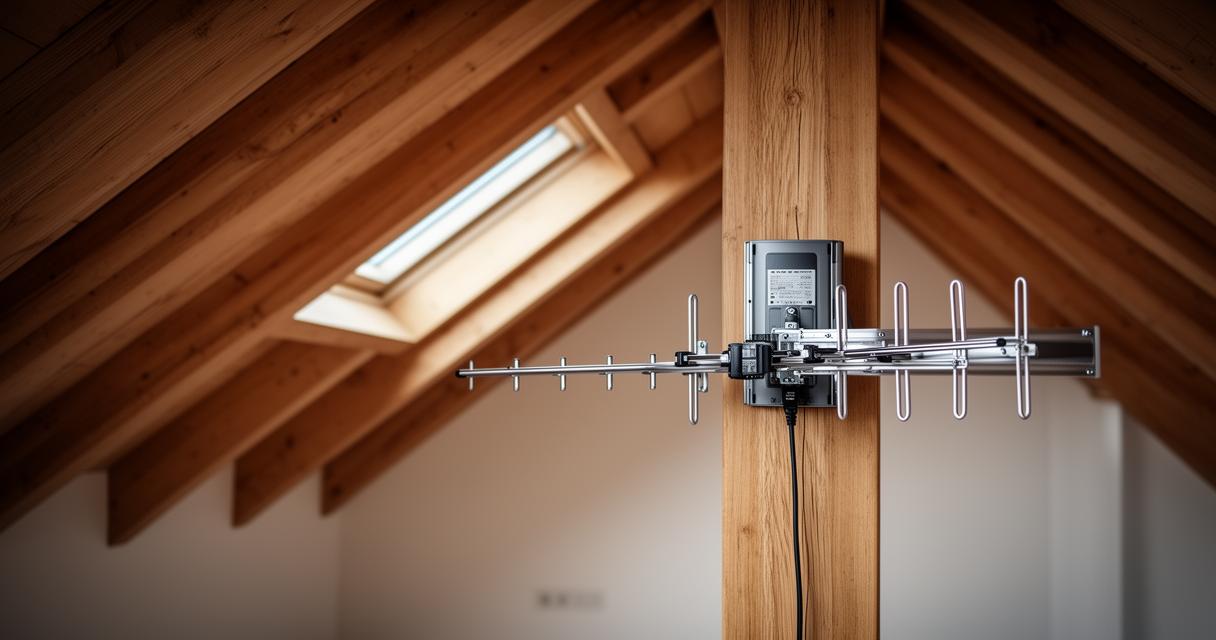
The first step towards achieving optimal performance is selecting an aerial that suits your specific requirements. Attic aerials can offer a similar range and quality to outdoor alternatives, making them a great choice for households with sufficient loft space or those seeking better reception without visible external installations. Size does matter when it comes to these devices, as some models can extend up to six feet in length and three feet in height. Popular antenna models such as the GE range, the RCA Yagi, and the ClearStream 2V are frequently recommended for their reliability and robust performance. These models have been designed to maximise signal strength and deliver a wide array of free channels. When considering your options, think about the types of programmes you wish to watch and the distance from the nearest transmission towers. This initial assessment ensures you invest in equipment that will serve your household well for years to come.
Finding the ideal location within your loft space
Once you have selected your aerial, the next crucial task is identifying the best position within your attic. Higher locations generally allow for better signal quality, so aim to place the aerial as high as possible without causing obstruction or creating hazards. Take accurate measurements of your loft space to determine whether you have room to accommodate larger models. Building materials and obstructions within the attic can interfere with reception, so it is wise to avoid placing the aerial near metal objects, insulation, or thick timber. Using maps or dedicated apps to pinpoint the direction of local transmitters will greatly assist in positioning your aerial correctly. Proper orientation towards the nearest transmission towers ensures you receive the strongest possible signal, reducing the likelihood of interference and enhancing overall performance. This planning stage may take a little extra time, but it pays dividends in terms of picture clarity and the number of channels you can access.
Installing and connecting your television aerial
Mounting Your Aerial Securely to Walls or Rafters
With your chosen location identified, it is time to mount the aerial securely. Depending on the structure of your loft, you may attach the device to a wall, rafters, or use a J-mount for added flexibility and stability. Ensure the mounting hardware is robust enough to support the weight and size of your aerial, especially if you have opted for a larger model. A secure installation prevents the aerial from shifting over time, which could otherwise lead to deteriorating signal quality. Take care to follow the manufacturer's instructions closely, as each model may have specific requirements for mounting and orientation. In some cases, you might need to drill holes and use appropriate fixings to anchor the aerial firmly. This step is essential not only for performance but also for safety, ensuring that the equipment remains in place during adverse weather conditions outside and the natural expansion and contraction of building materials within the attic.
Establishing a proper coaxial cable connection
After mounting the aerial, the next step is to establish a reliable connection to your television using a coaxial cable. Quality cables are vital for minimising signal loss and maintaining picture clarity. Ensure the connection at both the aerial and the television is tight and secure, as loose fittings can result in reduced reception quality. Running the coaxial cable neatly through the attic and down into your living space not only looks professional but also reduces the risk of accidental damage. If your home has multiple storeys or complex internal layouts, consider using cable clips or conduits to keep the wiring tidy and protected. It is worth noting that signal strength for attic antennas typically hovers around eighty-five to ninety per cent of that achieved by outdoor installations, and this can be improved further with the use of an amplifier if necessary. An amplifier boosts the signal, particularly useful in areas where reception might be weaker due to distance from transmission towers or interference from surrounding buildings.
Optimising signal reception and final touches
Scanning for Channels and Fine-Tuning Aerial Position
Once the physical installation and cable connections are complete, power on your television and initiate a channel scan. This process allows your TV to detect all available over-the-air television channels in your area. During the scan, remain patient as it may take several minutes to complete. After the scan, review the list of channels to ensure you are receiving the full range of free channels available. If certain channels appear weak or absent, slight adjustments to the aerial position can make a significant difference. Sometimes, rotating the aerial by just a few degrees or raising it slightly higher can dramatically improve reception optimisation. This fine-tuning stage is crucial for achieving the best possible picture and sound quality. Remember that even minor obstructions or shifts in building materials interference can impact performance, so experimenting with position and orientation is often necessary. Keep a notepad handy to record which adjustments yield the best results, making future troubleshooting much simpler.
Organising cables and ensuring easy future access
The final stage involves tidying up the installation to ensure both aesthetics and functionality. Organising cables neatly within the attic not only creates a clean appearance but also makes it easier to access the equipment if adjustments are needed in the future. Use cable ties or clips to secure loose wiring along rafters or walls, preventing tangles and potential damage. If you have invested in an OTA DVR such as the Tablo DUAL or QUAD models, these devices offer excellent channel management and varying storage capacity, with no monthly subscription required. Position your DVR in a location that is both accessible and close enough to the aerial for optimal signal reception. Ensure ventilation around electronic equipment to prevent overheating, especially during warmer months. With everything securely installed and organised, you can enjoy the benefits of over-the-air TV without the worry of weather-related disruptions. This setup offers long-term reliability and the freedom to access a wide variety of programmes, making it a worthwhile investment for any household seeking cost-effective entertainment solutions.
Watching television has transformed dramatically in recent years, with many households choosing to access over-the-air television for free channels and a broader selection of content. For those looking to enjoy this benefit whilst avoiding the hassle of outdoor installations, setting up an aerial inside your loft is an excellent solution. This approach not only shields your equipment from the elements but also delivers impressive reception quality in all weather conditions. Whether you live in a densely populated urban area or a more remote countryside location, understanding how to install a TV antenna in the attic can unlock a wealth of free entertainment without monthly subscriptions.
Choosing and positioning your attic aerial

Selecting the Right Type of Aerial for Your Needs
The first step towards achieving optimal performance is selecting an aerial that suits your specific requirements. Attic aerials can offer a similar range and quality to outdoor alternatives, making them a great choice for households with sufficient loft space or those seeking better reception without visible external installations. Size does matter when it comes to these devices, as some models can extend up to six feet in length and three feet in height. Popular antenna models such as the GE range, the RCA Yagi, and the ClearStream 2V are frequently recommended for their reliability and robust performance. These models have been designed to maximise signal strength and deliver a wide array of free channels. When considering your options, think about the types of programmes you wish to watch and the distance from the nearest transmission towers. This initial assessment ensures you invest in equipment that will serve your household well for years to come.
Finding the ideal location within your loft space
Once you have selected your aerial, the next crucial task is identifying the best position within your attic. Higher locations generally allow for better signal quality, so aim to place the aerial as high as possible without causing obstruction or creating hazards. Take accurate measurements of your loft space to determine whether you have room to accommodate larger models. Building materials and obstructions within the attic can interfere with reception, so it is wise to avoid placing the aerial near metal objects, insulation, or thick timber. Using maps or dedicated apps to pinpoint the direction of local transmitters will greatly assist in positioning your aerial correctly. Proper orientation towards the nearest transmission towers ensures you receive the strongest possible signal, reducing the likelihood of interference and enhancing overall performance. This planning stage may take a little extra time, but it pays dividends in terms of picture clarity and the number of channels you can access.
Installing and connecting your television aerial
Mounting Your Aerial Securely to Walls or Rafters
With your chosen location identified, it is time to mount the aerial securely. Depending on the structure of your loft, you may attach the device to a wall, rafters, or use a J-mount for added flexibility and stability. Ensure the mounting hardware is robust enough to support the weight and size of your aerial, especially if you have opted for a larger model. A secure installation prevents the aerial from shifting over time, which could otherwise lead to deteriorating signal quality. Take care to follow the manufacturer's instructions closely, as each model may have specific requirements for mounting and orientation. In some cases, you might need to drill holes and use appropriate fixings to anchor the aerial firmly. This step is essential not only for performance but also for safety, ensuring that the equipment remains in place during adverse weather conditions outside and the natural expansion and contraction of building materials within the attic.
Establishing a proper coaxial cable connection
After mounting the aerial, the next step is to establish a reliable connection to your television using a coaxial cable. Quality cables are vital for minimising signal loss and maintaining picture clarity. Ensure the connection at both the aerial and the television is tight and secure, as loose fittings can result in reduced reception quality. Running the coaxial cable neatly through the attic and down into your living space not only looks professional but also reduces the risk of accidental damage. If your home has multiple storeys or complex internal layouts, consider using cable clips or conduits to keep the wiring tidy and protected. It is worth noting that signal strength for attic antennas typically hovers around eighty-five to ninety per cent of that achieved by outdoor installations, and this can be improved further with the use of an amplifier if necessary. An amplifier boosts the signal, particularly useful in areas where reception might be weaker due to distance from transmission towers or interference from surrounding buildings.
Optimising signal reception and final touches
Scanning for Channels and Fine-Tuning Aerial Position
Once the physical installation and cable connections are complete, power on your television and initiate a channel scan. This process allows your TV to detect all available over-the-air television channels in your area. During the scan, remain patient as it may take several minutes to complete. After the scan, review the list of channels to ensure you are receiving the full range of free channels available. If certain channels appear weak or absent, slight adjustments to the aerial position can make a significant difference. Sometimes, rotating the aerial by just a few degrees or raising it slightly higher can dramatically improve reception optimisation. This fine-tuning stage is crucial for achieving the best possible picture and sound quality. Remember that even minor obstructions or shifts in building materials interference can impact performance, so experimenting with position and orientation is often necessary. Keep a notepad handy to record which adjustments yield the best results, making future troubleshooting much simpler.
Organising cables and ensuring easy future access
The final stage involves tidying up the installation to ensure both aesthetics and functionality. Organising cables neatly within the attic not only creates a clean appearance but also makes it easier to access the equipment if adjustments are needed in the future. Use cable ties or clips to secure loose wiring along rafters or walls, preventing tangles and potential damage. If you have invested in an OTA DVR such as the Tablo DUAL or QUAD models, these devices offer excellent channel management and varying storage capacity, with no monthly subscription required. Position your DVR in a location that is both accessible and close enough to the aerial for optimal signal reception. Ensure ventilation around electronic equipment to prevent overheating, especially during warmer months. With everything securely installed and organised, you can enjoy the benefits of over-the-air TV without the worry of weather-related disruptions. This setup offers long-term reliability and the freedom to access a wide variety of programmes, making it a worthwhile investment for any household seeking cost-effective entertainment solutions.